

You can connect an AI app, such as Claude Desktop, Claude Code or Cursor, to your site. Then you can ask it questions in plain words, like “Why did this reader’s card fail?” or “Cancel this subscription at the end of the month.” The app looks up subscribers, checks payments and does support tasks for you, through PaywallProject’s tools.
This uses MCP (Model Context Protocol). MCP is an open standard that AI apps use to talk to other software. You don’t need to know how it works. PaywallProject sets most of it up for you: one screen installs the MCP Adapter, connects your app, gives you the setup to copy, and tests it.
This guide uses Claude Desktop, the Claude app for Mac and Windows, for the main steps. Developers who use Claude Code or Cursor can skip to For developers at the end.
Before you start
- Your site needs WordPress 6.9 or newer. PaywallProject itself still runs on WordPress 6.5, but MCP doesn’t.
- Your site must use HTTPS (the padlock in the browser’s address bar). WordPress needs it for Application Passwords, which this setup uses.
- You need an administrator account to install the MCP Adapter and use the AI and MCP tab. Support staff connect from their own profile. See Connect your staff.
- For Claude Desktop, you need a Claude account and a Mac or Windows computer where you can install apps.
Part 1: Set up your site
You do this part once, in WordPress.
Step 1. Open the AI and MCP tab
In WordPress, go to PaywallProject → Settings and click the AI and MCP tab.
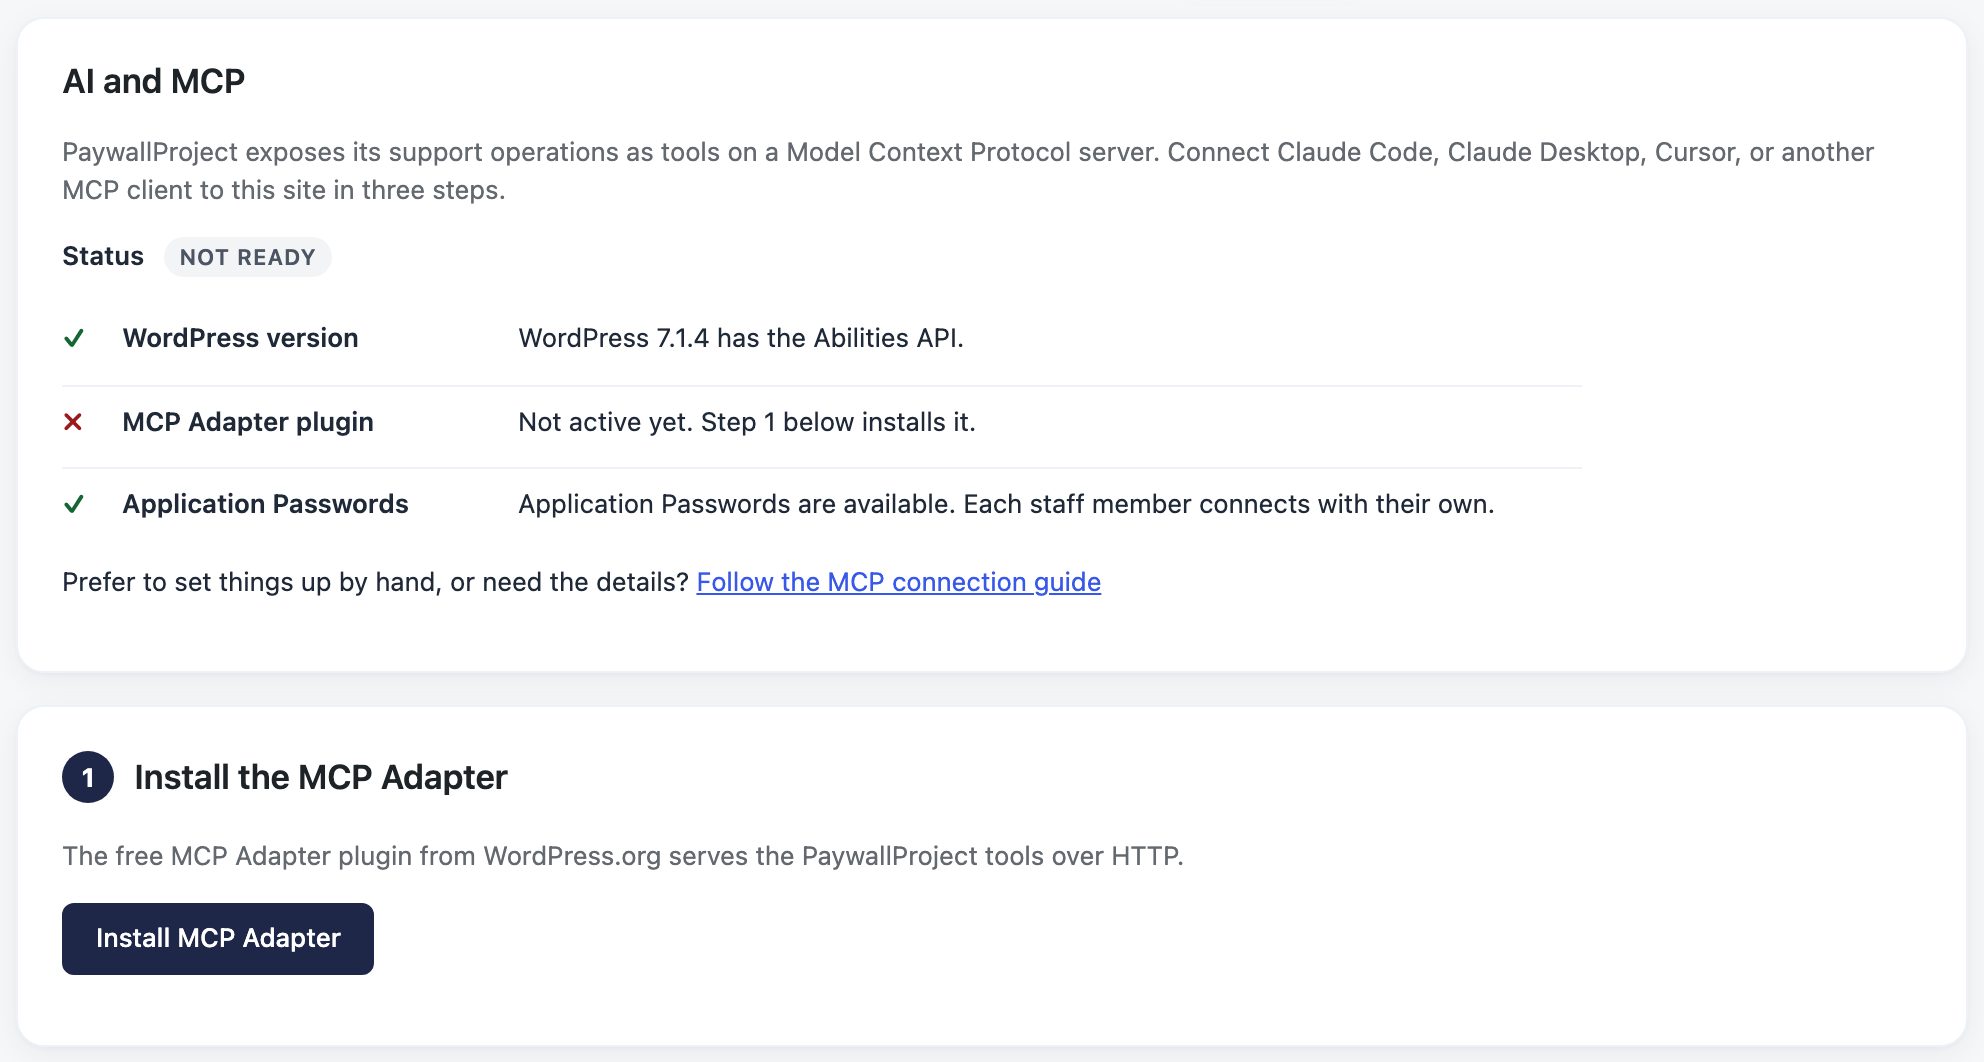
At the top, the Status checklist has three lines: WordPress version, MCP Adapter plugin and Application Passwords. A tick means that line is ready. A cross tells you what’s missing. When all three are ready, the status says Ready.
Step 2. Install the MCP Adapter
The MCP Adapter is a free plugin from WordPress.org. It lets AI apps reach PaywallProject’s tools.
- Under 1 Install the MCP Adapter, click Install MCP Adapter.
- Wait a few seconds. PaywallProject downloads the plugin from WordPress.org and turns it on. The button says Installed. Reloading… and the page reloads.
- Check that the status now says Ready and the step says the MCP Adapter is active.
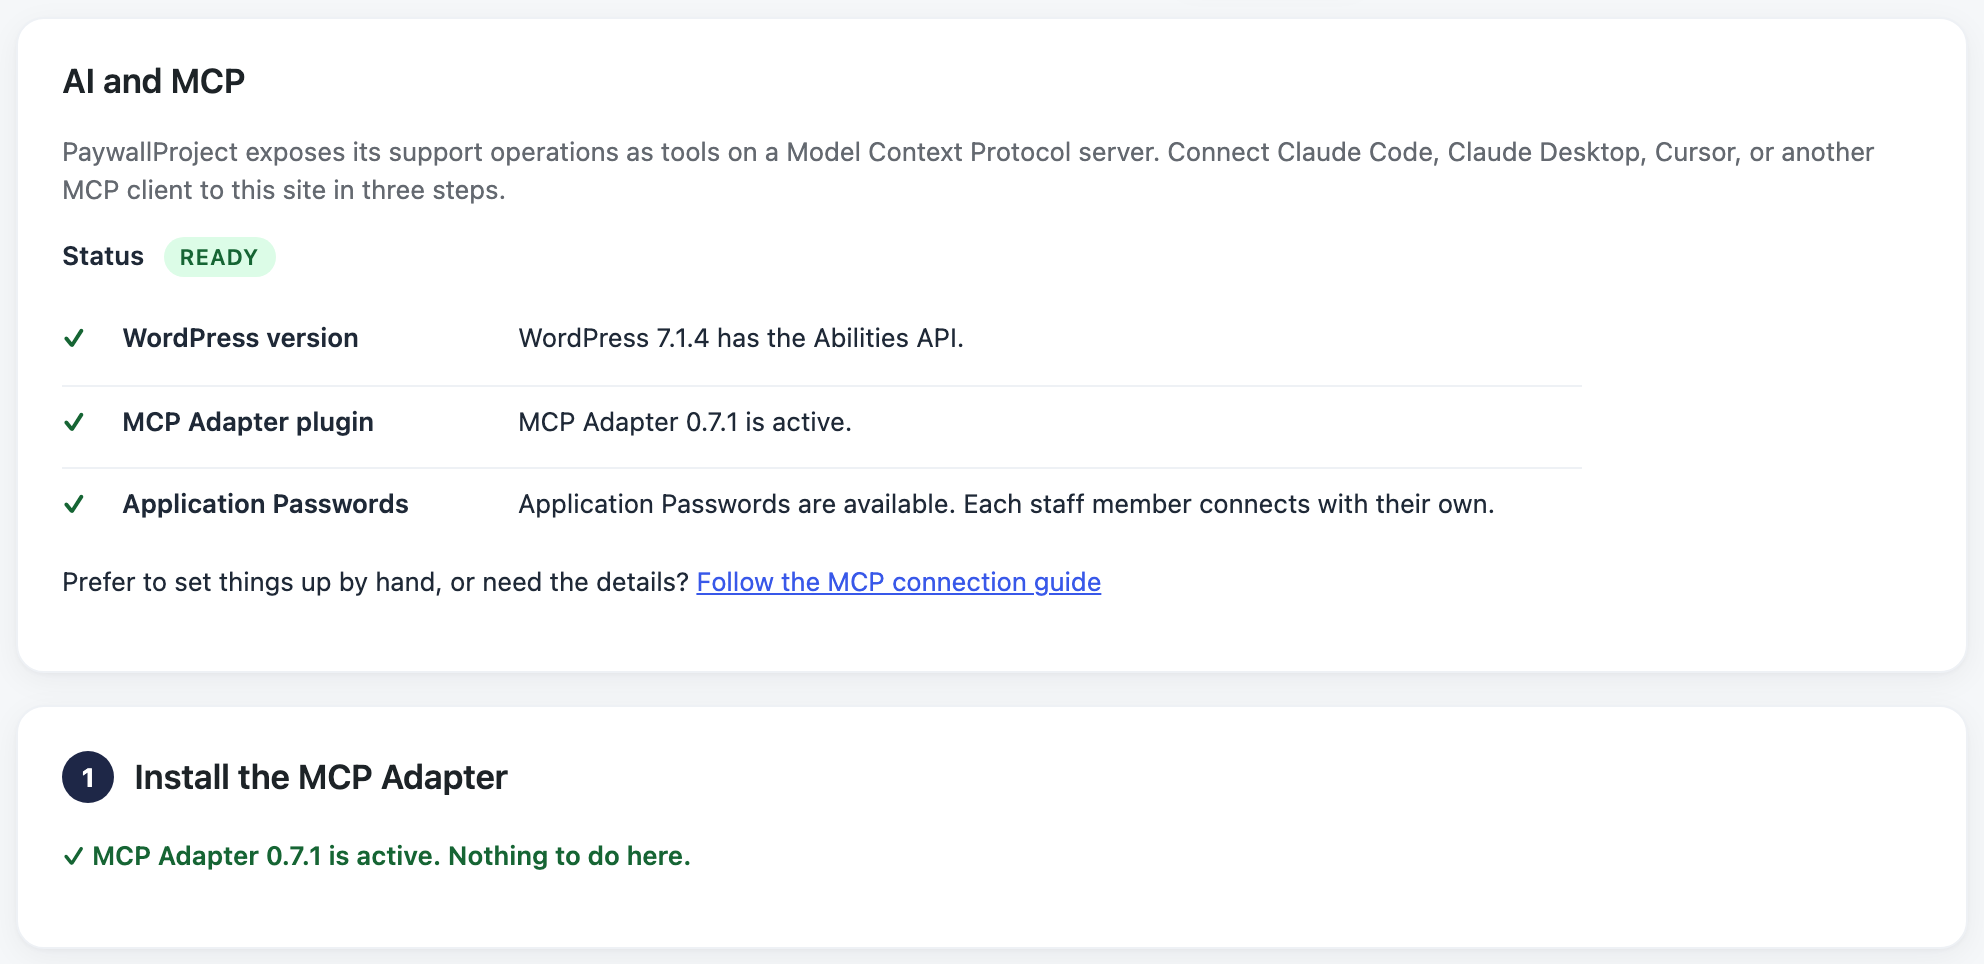
If the plugin is already installed but turned off, the button says Activate MCP Adapter instead. If the Adapter is already active, this step says “Nothing to do here”, so go on to Step 3.
Some sites can’t install plugins from wp-admin. For example, the host turns off file changes, the site asks for FTP details, or the site is part of a multisite network. Then the step explains why and shows the link Install it by hand from WordPress.org. Install the MCP Adapter the way your host allows, then reload the tab.
Step 3. Create a connection
A connection is a special password for one AI app. WordPress calls it an Application Password. It isn’t your normal login password. It lets the app act as you, with your permissions, and nothing more. You can cancel it at any time without changing your own password.
- Under 2 Connect, open the App menu and choose Claude Desktop. The menu starts on Claude Code, so check you changed it.
- Click Connect.
- A green box shows the name of the new connection. The name is made of PaywallProject MCP, the app you chose, and today’s date. It also appears under Your connections, marked Never used.
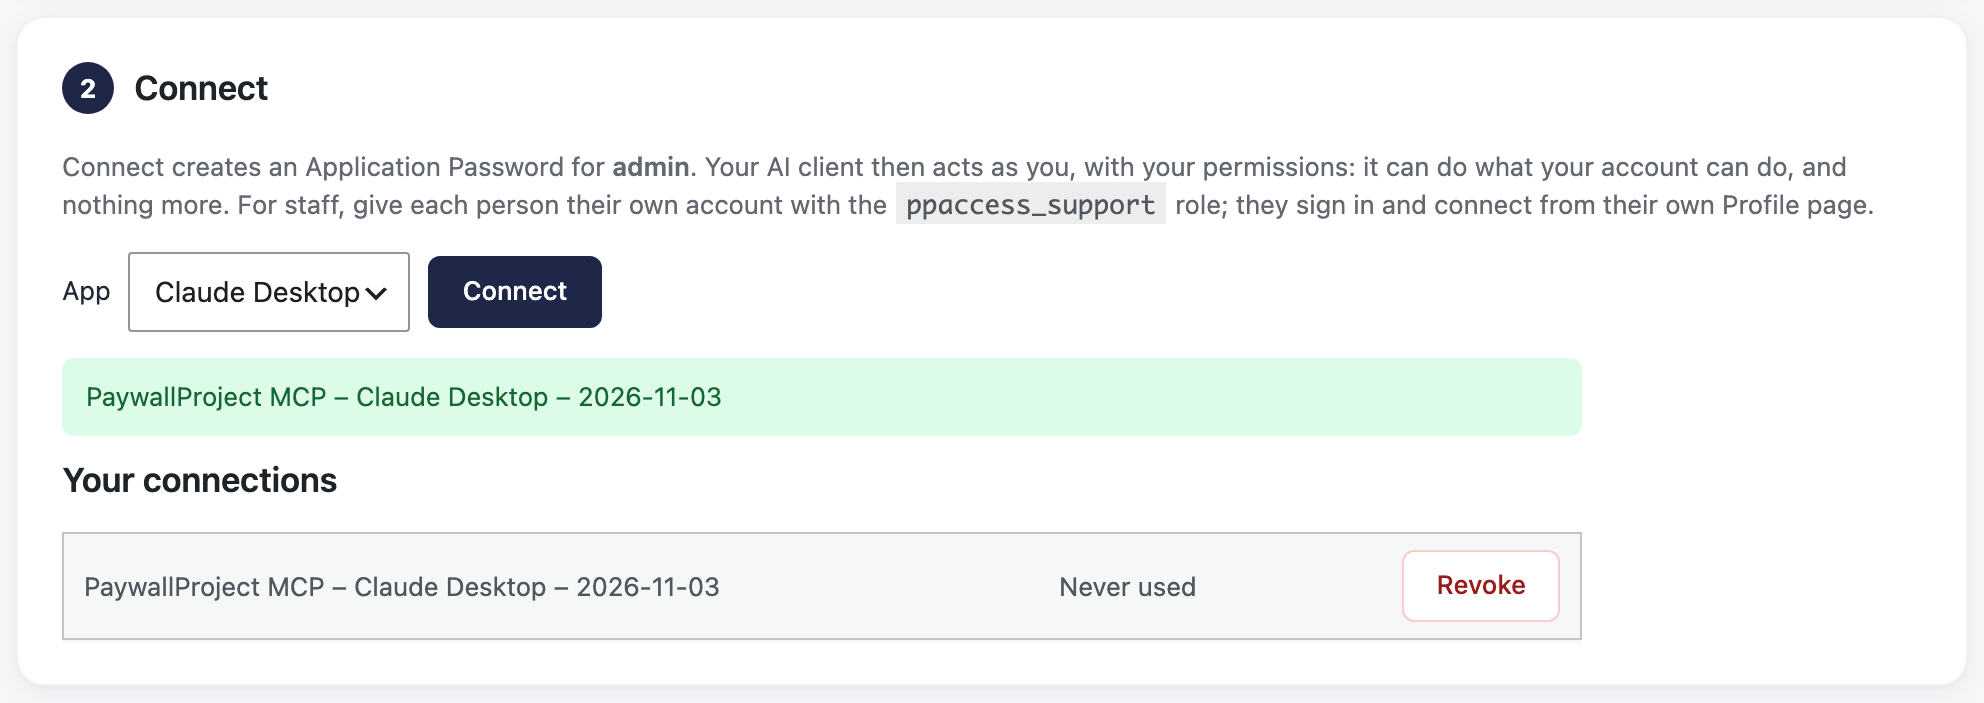
Keep this page open until you finish Part 2. WordPress shows the password only once. If you reload or leave the page, it’s gone, and you need to click Connect again.
Step 4. Test the connection
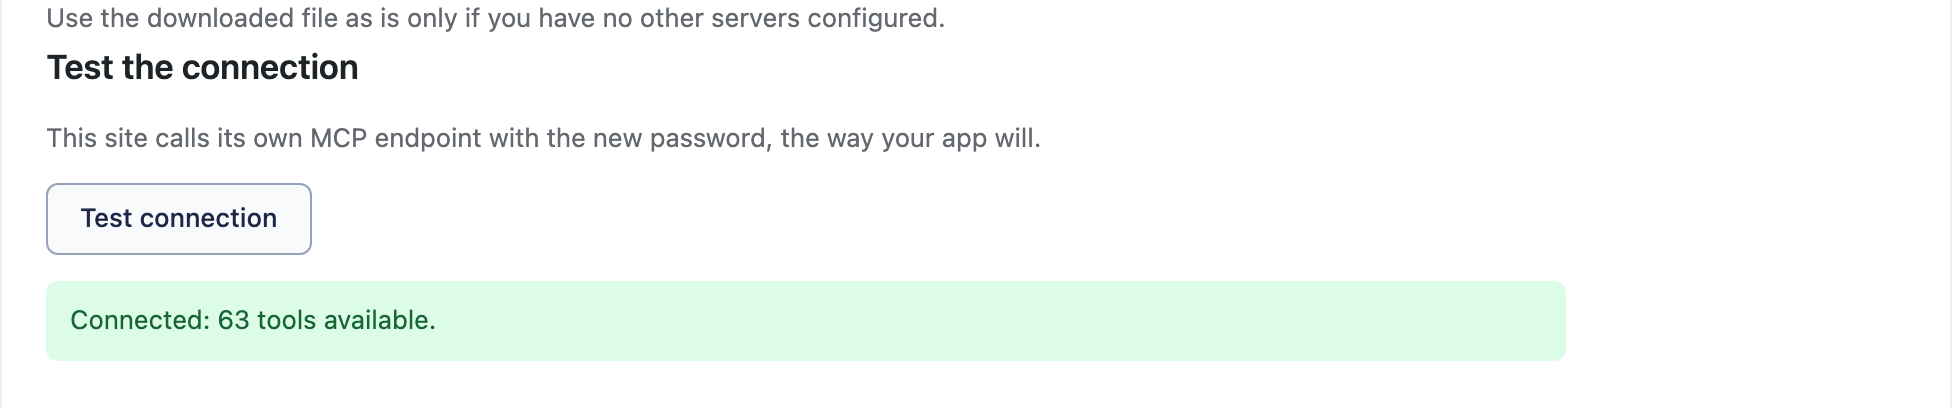
Scroll down to Test the connection and click Test connection. Your site calls itself with the new password, the same way your app will.
If it works, you see “Connected: 63 tools available.” The number can be different on your site. If you see an error, see If the test fails below.
Part 2: Connect Claude Desktop
Claude Desktop reaches your site through a small helper program that needs Node.js. Node.js is a free program that runs it in the background. You install it once, like any other app.
Step 5. Install Claude Desktop and Node.js
- If you don’t have Claude Desktop yet, download it from claude.ai/download, install it, and sign in.
- Go to nodejs.org and download the LTS version. LTS is the stable version.
- Open the file you downloaded. On a Mac, it ends in
.pkg. On Windows, it ends in.msi. Click through the installer and accept the defaults. - If Claude Desktop was open, quit it now and open it again, so it finds Node.js.
Step 6. Copy your setup from WordPress
Go back to the AI and MCP tab in WordPress, where you left it open.
- Under 3 Pick your app, click the Claude Desktop tab.
- You see a block of text that starts with
{. It already contains your site’s address, your username and the new password. - Click Copy next to it. The button changes to Copied.
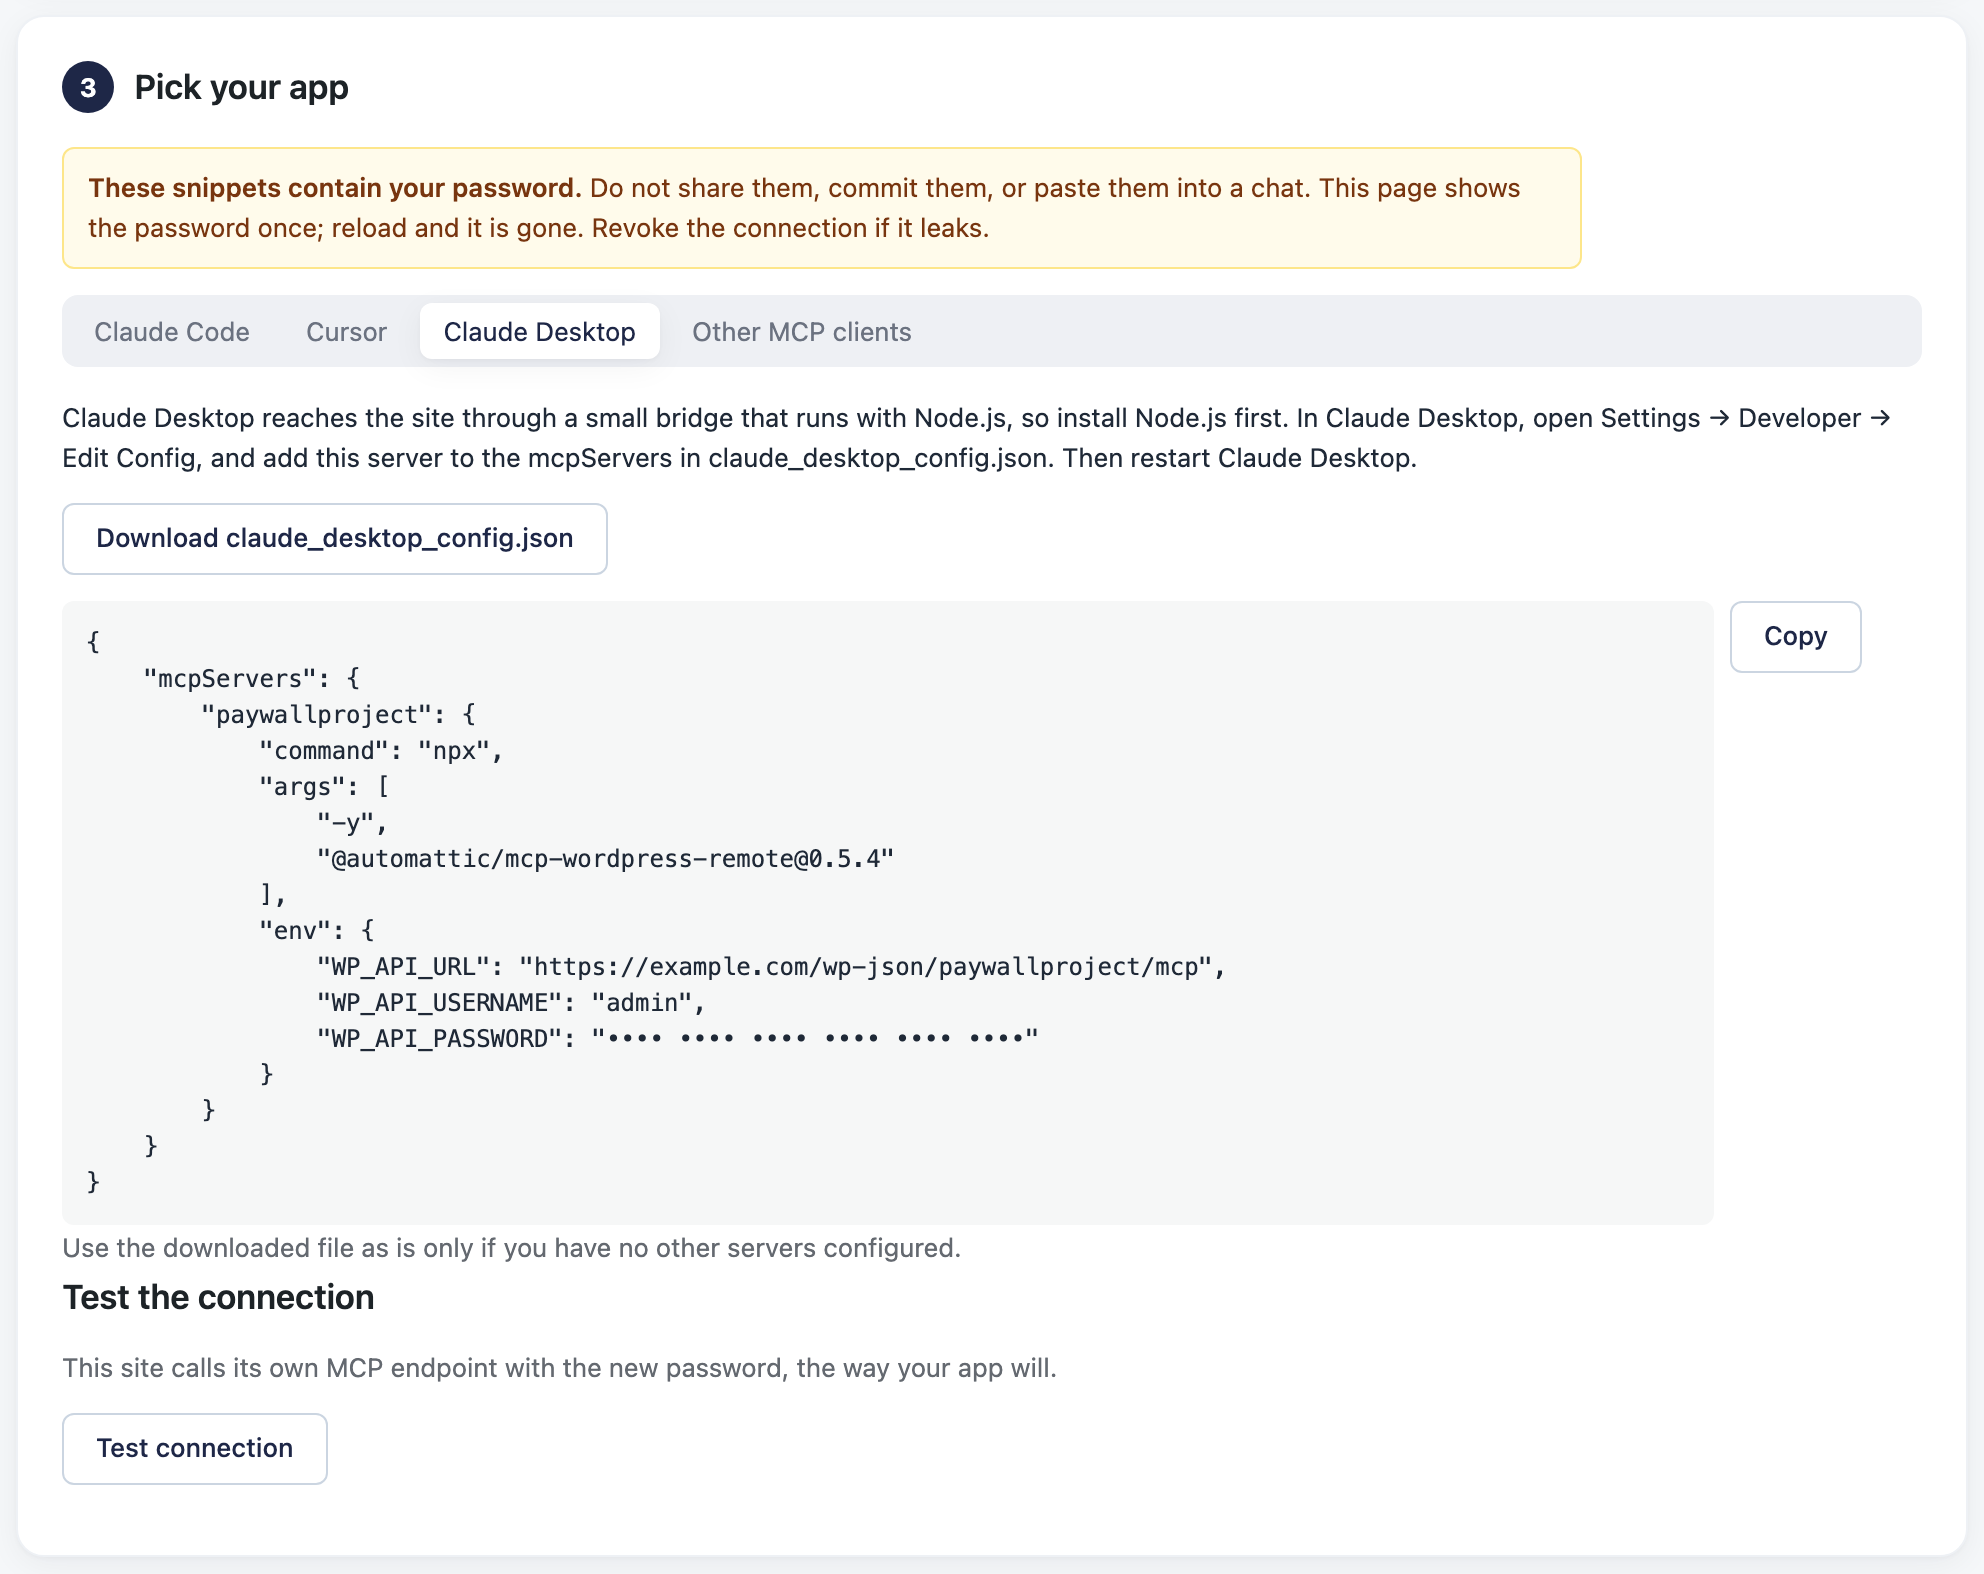
This text contains your password. Don’t paste it into a chat, an email or a shared document. Paste it only into Claude Desktop’s settings file, in the next step.
Step 7. Paste it into Claude Desktop
Claude Desktop keeps its list of connections in a settings file called claude_desktop_config.json. You open it from inside Claude Desktop.
- Open Claude Desktop.
- Open its settings. On a Mac, click Claude in the menu bar at the top of the screen, then Settings…. On Windows, open the menu in the Claude window and choose Settings. Use these app settings, not the settings for your Claude account inside a chat.
- In the left sidebar, click Developer.
- Click Edit Config. Claude Desktop creates the file if it doesn’t exist yet. It opens the file or shows it in a Finder (Mac) or File Explorer (Windows) window.
- If you see the file in a window, open it with a plain text editor. On a Mac, right-click it, choose Open With, then TextEdit. On Windows, right-click it, choose Open with, then Notepad.
- Look at what’s in the file.
- If it’s empty, contains only
{}, or doesn’t contain"mcpServers": select everything (Command+A on a Mac, Ctrl+A on Windows) and paste (Command+V or Ctrl+V). Your pasted text replaces it. - If it already contains
"mcpServers", you’ve connected other tools before. Don’t replace the file, or those tools stop working. Ask whoever set them up to add the"paywallproject"part to the list.
- If it’s empty, contains only
- Save the file (Command+S or Ctrl+S) and close the text editor.
Instead of copy and paste, you can click Download claude_desktop_config.json. Use the downloaded file as it is only if you have no other connections, because it replaces the whole file.
Step 8. Restart Claude Desktop
Claude Desktop reads the settings file only when it starts. Closing the window isn’t enough.
- On a Mac, click Claude in the menu bar, then Quit Claude (or press Command+Q).
- On Windows, close the window, then check the small icons near the clock (the system tray). If you see the Claude icon, right-click it and choose to quit.
Then open Claude Desktop again.
Step 9. Check that PaywallProject shows up
- Start a new chat.
- Click the + button in the bottom-left corner of the message box.
- Move the mouse over Connectors and click Manage connectors.
- Find paywallproject in the list. Select it to see its tools.
If paywallproject isn’t there, quit and reopen Claude Desktop once more. Then check that the file you saved starts with { and ends with }, and that Node.js is installed. Claude’s own guide, Connect to local MCP servers, has more help.
We haven’t included pictures of Claude Desktop’s own screens, because they change often. The menu names above come from Claude’s current guide.
Part 3: Ask your first question
Type a question in the chat. A good first one is:
Use PaywallProject to show this site’s system status.
The first time Claude uses a PaywallProject tool, it asks your permission. Read what it wants to do and allow it. The answer includes your site’s Stripe mode (test or live), so you know it reached the right site.
Then try real support questions, for example:
- Find the subscriber [email protected] and tell me why their last payment failed.
- Show me the reading history for [email protected].
- Resend the welcome email to [email protected].
Keep your app’s permission prompts on, and check the details before you allow a change. For a refund, a plan change and other actions that charge or move money, the app must get a preview first, so you see the amount before anything happens. For the full list of what it can do, see What your AI app can do in PaywallProject (MCP tools).
The write limit
To stop a confused app from making hundreds of changes in a row, each connection can make 30 changes per minute. The count starts again at the start of each clock minute.
- All the tools that change something share the same 30. A change that fails still counts.
- Looking things up and previews don’t count. You can always read.
- Each connection has its own limit. Two staff members, or two apps, don’t use up each other’s changes.
- When the limit is reached, the app gets a message like “MCP write limit reached. Wait 12 seconds before trying again.” Nothing changes, nothing is sent to Stripe, and a preview the app already has stays valid. The app can try again after the wait.
The limit applies only to AI apps. Your own work in wp-admin isn’t limited. A developer can change the number with the ppaccess_mcp_write_limit filter. Setting it to 0 turns off all changes through MCP and keeps lookups working.
The audit log
PaywallProject records every change an AI app makes. It also records support changes made in wp-admin and by readers on their account page. If it can’t write the record, it doesn’t make the change.
Each record shows:
- When it happened (in UTC).
- Who did it: the WordPress user, and which of their connections was used.
- Where it came from:
mcp(an AI app),admin(wp-admin),self_service(the reader’s account page),cli(WP-CLI) orwebhook(Stripe). - What it did and to what, for example a cancel for one subscriber.
- What the app asked for. Passwords, keys, tokens and card details are hidden.
- The result: succeeded, failed (with the error), partial (Stripe changed, but the site couldn’t save its side) or pending. It also shows the Stripe mode and the Stripe IDs the change touched.
Where to see it:
- For one subscriber: go to PaywallProject → Subscribers and open the subscriber. The History box lists the last 20 changes to that subscriber, with Date, Action, By, Via and Result.
- For everything: ask your AI app, for example Show me the audit log for today or What did MCP change for subscriber 114? The app can filter by subscriber, user, action, source, result and date. Changes to levels, coupons, groups and settings appear here, not in a subscriber’s History.
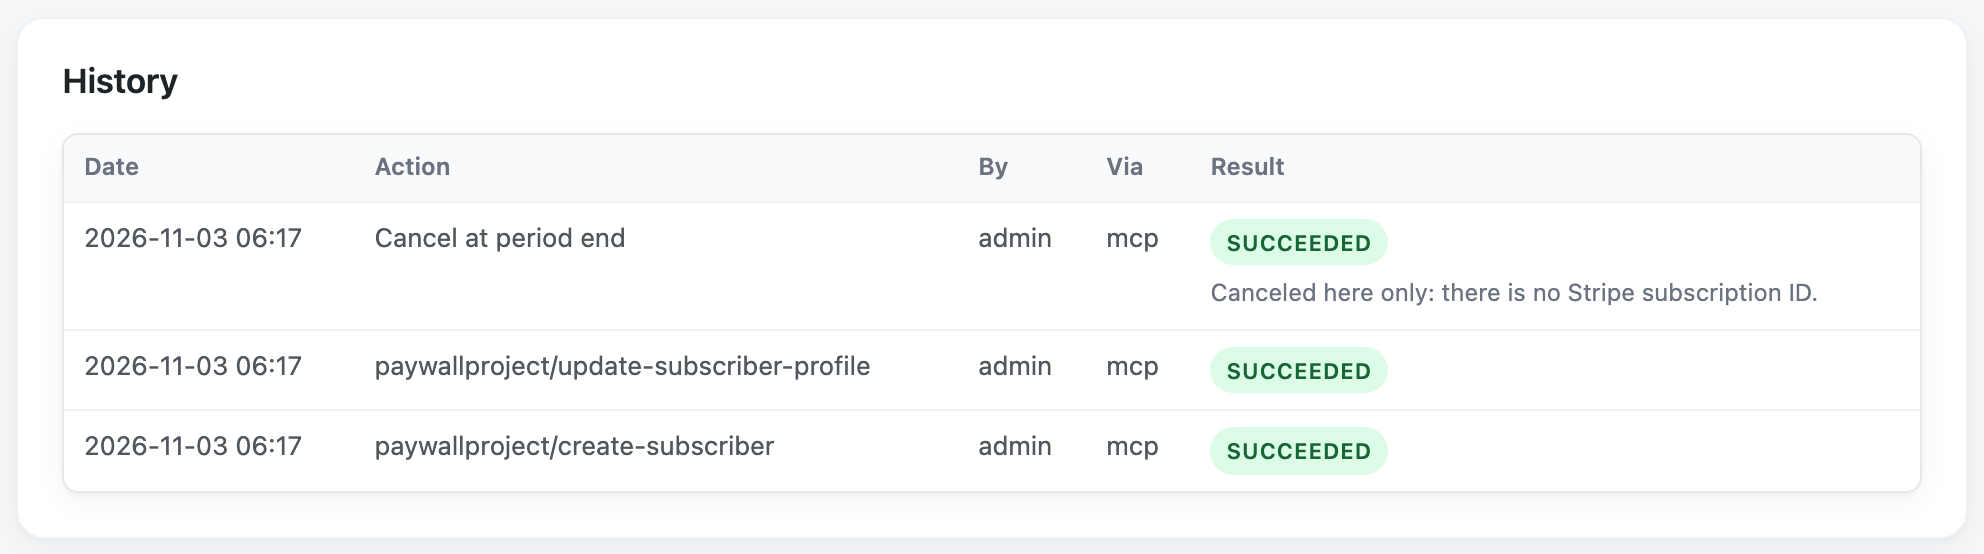
There’s no separate audit log screen in wp-admin. The records are kept in your site’s database.
Disconnect an app
To stop an app reaching your site, cancel its connection in WordPress:
- Go to PaywallProject → Settings → AI and MCP.
- Under Your connections, find the app. Each line shows the connection’s name, with the app and the date you made it, and when it was last used.
- Click Revoke and confirm. The app stops working at once.
Do this when you stop using an app, if you think the password leaked, or when a staff member leaves. To tidy up Claude Desktop too, remove the "paywallproject" part from its settings file and restart it.
Make one connection per app. Then you can revoke one without the others. Your connections lists only connections made on this screen. Application Passwords you made elsewhere stay on your Profile page.
If the test fails
Test connection names the problem and how to fix it:
- Click Connect first: you reloaded the page, so the password is gone. Click Connect again, then test.
- MCP Adapter not active: go back to Step 2, or activate the plugin under Plugins. If the Adapter is active but the endpoint doesn’t exist, save Settings → Permalinks once.
- Application Passwords turned off: they need HTTPS, and a host setting or a security plugin can turn them off. Turn them back on, or ask your host.
- Authorization header removed: this is common on Apache hosts. Ask your host to pass the Authorization header to PHP. The message shows the
.htaccessline that fixes it. - Loopback blocked: your host stops the site from calling itself. Your app may still connect from your computer, so try it.
- Certificate not verified: the test checks your site’s SSL certificate before it sends the password. Install a valid certificate. Your host can help.
- Endpoint redirected: your site redirects its address, for example from http to https or to the www address. The test doesn’t follow redirects, so your password stays on your site. Set Settings → General → Site Address (URL) to the address your site redirects to.
- Endpoint on another address: a plugin changed the address of your site’s REST API. The test stops before it sends the password.
- Not an MCP tool list: a caching or security layer changed the answer. Exclude
/wp-json/from it and test again. - No permission: the account has no PaywallProject permissions. Use an administrator, or give the user the PaywallProject Support role.
- WordPress too old: update to WordPress 6.9 or newer.
- Password rejected: the connection was revoked. Click Connect again.
Connect your staff
Give each staff member their own WordPress account with the PaywallProject Support role. The screen shows this role by its short name, ppaccess_support. The role can look up and help subscribers, cancel, resume and change plans, but it can’t issue refunds or change settings. See What your AI app can do for the full list.
Support staff have no PaywallProject screens in wp-admin. They sign in, open their Profile page, and use the PaywallProject MCP section there. The steps are the same: Connect, pick an app, and Test connection. Set up the MCP Adapter first. Until then, their profile says MCP isn’t set up yet.
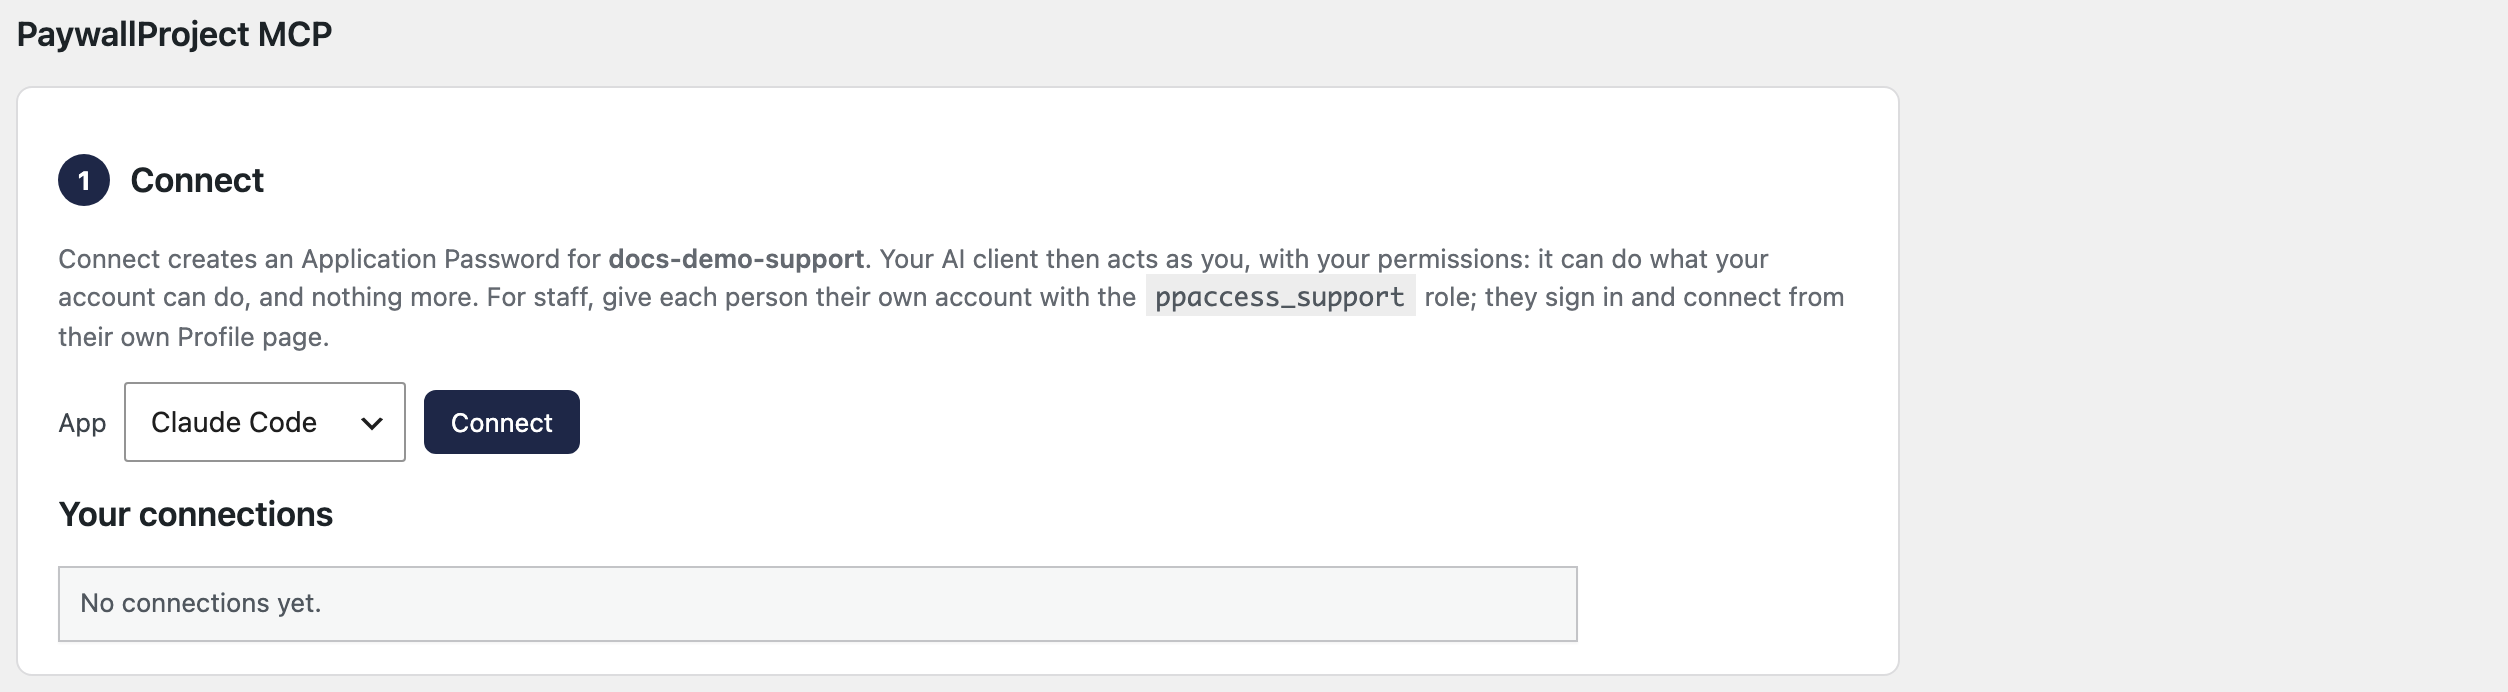
Each connection acts as the person who made it. Their AI app can do what their account can do, and nothing more. The audit log shows which person made each change.
Keep the password safe
- Every setup snippet contains the password. Don’t share a snippet, paste it into a chat, or save it in a shared file.
- WordPress shows the password once. If you reload the page, it’s gone. Click Connect again for a new one.
- PaywallProject never stores or logs the password. WordPress keeps only a scrambled copy (a hash).
For developers
The Pick your app step has tabs for three more kinds of app. Choose the matching app in the App menu before you click Connect, so the connection gets the right name. The menu calls the last option Other client.
Claude Code
Claude Code runs in a terminal, a window where you type commands. The Claude Code tab gives you one ready-made command.
- Click Copy next to the command.
- Open a terminal. On a Mac, press Command+Space, type Terminal and press Return. On Windows, click Start, type PowerShell and press Enter.
- Paste the command and press Return or Enter. It adds the server for every project on that computer.
- To check, type
claude mcp listand press Return or Enter. The line forpaywallprojectshould say it’s connected. Restart Claude Code if it was open.
Claude Code must already be installed. The command contains your password, so don’t save it in a shared script.
Cursor
On the Cursor tab, click Add to Cursor. Cursor opens and asks you to confirm. The link carries your password, so don’t share it. If the button does nothing, paste the JSON shown into ~/.cursor/mcp.json, merged with any servers already there.
Other MCP clients
Any app that speaks MCP over Streamable HTTP can connect with the URL and Header on the Other MCP clients tab. Use that exact URL, which ends in /wp-json/paywallproject/mcp. The MCP Adapter’s default server doesn’t have PaywallProject’s tools. We haven’t tested apps that run in the cloud, so check each app’s own help.
Set it up by hand
If the buttons can’t run on your site, open Advanced: set up by hand on the same tab. It shows your Endpoint, a button to Create an Application Password on your profile, a Claude Code command to fill in, and the list of tools. The MCP connection guide at the bottom of the tab covers every step, including testing on a local site.